
It was a surprisingly easy project, just using a little bias binding machine, fabric of choice, thread and clear nail polish, a good, sharp pair of scissors, iron, ironing board, and sewing machine. If we have a quilting ruler, that will make getting the 45 degree angle bang on as well, to cut the fabric on the bias for the laces, as well as a rotary cutter.
Devon's post clearly laid out exactly how to make our own tape laces, which I have repeated here, using snips of some of Devon's images:
- Use a diagonal ruler (or a quilting ruler) to line up fabric to a 45 degree angle for making the tapes. Get the fabric as square as possible (it makes lining up your cut strips easier later)
- Use scissors (or a rotary cutter) to cut the fabric into strips 5cm apart (that provides just under 1cm wide tape laces). Depending on your fabric width, cut either two or four strips (you need laces bout 1.2m for ankle boots).

- If using two fabric strips per lace, cross the ends, right-sides inwards, and pin.

- Stitch together at 2.0.
- Press seam open, trim waste.
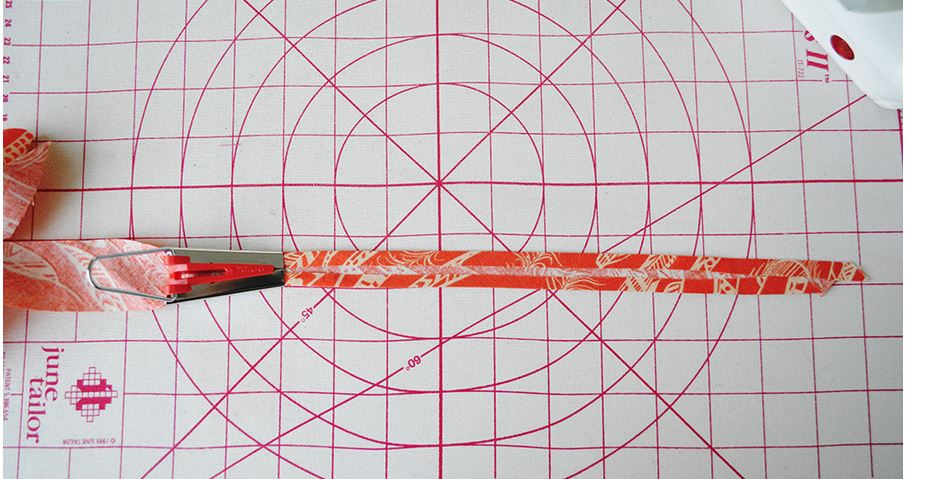
- With the wrong side facing up (NB: may need to trim the strip to a point), run each strip evenly through the bias binding machine, ironing the resulting binding flat as we go.

- Fold the wrong sides together, then press firmly.
- Sew down the length of the binding at about 2.5

- Mark each lace at 5mm from either end and 12mm: this is where we are going to sew the lace off into an 'aglet'.

- Fold the fabric into another two or three thicknesses.

- Select zigzag at 0.75 and a width of 5 (or 5.5) and sew evenly across the width of the folded lace ('satin stitch'), between 5 and 12mm from each lace end.

- Trim waste.
- Squeeze the aglet to make it tubular, paint it with a thick coat of nail varnish.

- Dry. Trim excess thread.
- Paint again. Leave to dry (or we can replace the nail varnish steps by using Plasti Dip).


Sam
- Reference: Iott|, D. (August 2015). Sew Your Own Shoelaces. Retrieved from http://www.thesewingparty.com/2015/08/sew-your-own-shoelaces/
No comments:
Post a Comment