I recently wanted to get a pair of unusually coloured tape laces as a bit of a fashion statement for a funky pair of boots, and went looking for laces to buy. After a fairly exhaustive trawl through the net, I ran across a great post by Devon Iott (August 2015) on how to make our own shoelaces.
It was a surprisingly easy project, just using a little bias binding machine, fabric of choice, thread and clear nail polish, a good, sharp pair of scissors, iron, ironing board, and sewing machine. If we have a quilting ruler, that will make getting the 45 degree angle bang on as well, to cut the fabric on the bias for the laces, as well as a rotary cutter.
Devon's post clearly laid out exactly how to make our own tape laces, which I have repeated here, using snips of some of Devon's images:
- Use a diagonal ruler (or a quilting ruler) to line up fabric to a 45 degree angle for making the tapes. Get the fabric as square as possible (it makes lining up your cut strips easier later)
- Use scissors (or a rotary cutter) to cut the fabric into strips 5cm apart (that provides just under 1cm wide tape laces). Depending on your fabric width, cut either two or four strips (you need laces bout 1.2m for ankle boots).
- If using two fabric strips per lace, cross the ends, right-sides inwards, and pin.
- Stitch together at 2.0.
- Press seam open, trim waste.
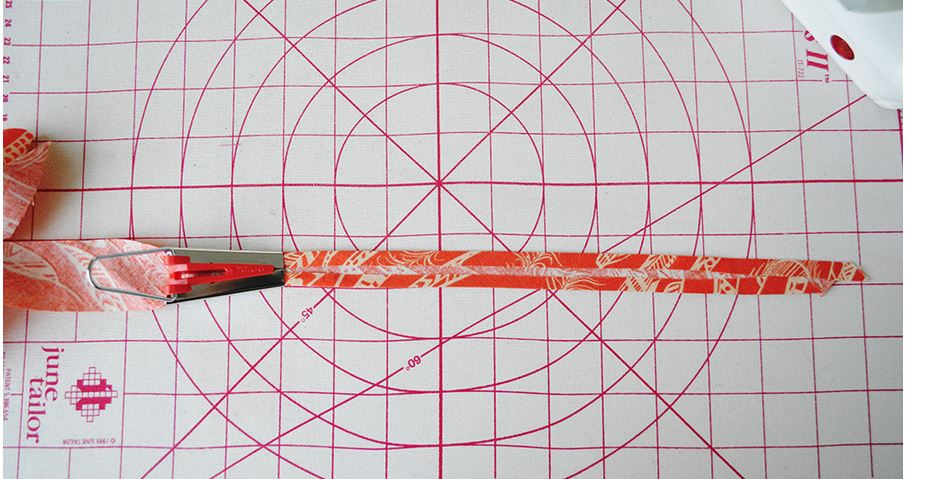
- With the wrong side facing up (NB: may need to trim the strip to a point), run each strip evenly through the bias binding machine, ironing the resulting binding flat as we go.
- Fold the wrong sides together, then press firmly.
- Sew down the length of the binding at about 2.5
- Mark each lace at 5mm from either end and 12mm: this is where we are going to sew the lace off into an 'aglet'.
- Fold the fabric into another two or three thicknesses.
- Select zigzag at 0.75 and a width of 5 (or 5.5) and sew evenly across the width of the folded lace ('satin stitch'), between 5 and 12mm from each lace end.
- Trim waste.
- Squeeze the aglet to make it tubular, paint it with a thick coat of nail varnish.
- Dry. Trim excess thread.
- Paint again. Leave to dry (or we can replace the nail varnish steps by using Plasti Dip).
A reader also posted in the comment that "for aglets, I use 3/16 heat shrink tubing, available at any home DIY store in the electrical dept. Slip them on the ends and hit with a hair dryer or craft heat gun. Tah dah, perfect aglets!".
Sam
Hi All,
Another busy month is behind us, and we are both feeling like there isn't a lot of light at the end of the tunnel, which is worrying.
While Semester 1 is over for me, Semester 2 is looming, and I have been asked to mentor a new lecturer, which has added to my workload. I am also still mentoring full year students right through the break, as well as hammering away at the PhD. Jan keeps saying that his workload only gets bigger each day he goes into the office, and he is having to do far too much administration, rather than the hands on work that he was promised. I know how that feels too!
Jan played in the concert opening the upgraded School of Music (it took five years to get the earthquake strengthening up to code - and there is a separate post on this), and then
soon after had an NSO concert, all of which has kept him pretty darned
busy in his 'downtime'. And then there is the current course he is doing for his Post-Grad Cert...however, in a rare moment of quiet on a Sunday afternoon, the dogs and Jan can be found enjoying some peace.
Tania's surgery seems to have gone well and she has now
moved into radiotherapy treatment. The reports on clear margins and the
progress made seem very positive, which is very encouraging. Tina has
done a stellar job as Tan's advocate. Thank goodness she was able to be
there.
My mother is well too - and long may all that
last. She is still driving out to have lunch with us a couple of times a
month, and we have been catching up with other members of the family in
between in Nelson for family birthdays and celebrations.
The neighbour has finally milled all of the pine plantation at the end of the valley. The image below shows the view of the last dozen trees being felled, taken from halfway up our driveway.
John
has started his tour around North America on his trusty old Norton Commando
and almost immediately ran into engine trouble. However, the
network of past customers, friends and vintage bike afficionados have
seen him right and off, enjoying the views up the east coast of America
and into Canada.
We caught up with Jenny L this month when she was up in Nelson; and with Tracey, Erica and H.
Hartmut and Uta came to stay on their way down to the island to attend a conference in Queenstown. It was lovely to see them both. They came for a few days on their way down, then called in for a few days on their way back. Hartmut left us with some of his skillful woodworking - both Jan and I are the lucky recipients of some gorgeous turned pens.

I have been rationalising some of our stuff around the house: I got rid of a whole load of old kitchen stuff to the Salvation Army shop in Nelson. However, I have also been doing a little bit of purchasing. I was reading that cheap china is often cheap because the clay itself may have heavy metals contamination... and once it loses its glaze, it can contaminate whatever it is used for. So I dumped our crappy old cups and bought new porcelain ones on sale at Farmers for $2 each. Then I decided that 17 years was enough time to wait for bedside tables, and ordered two flatpack ones from 1-day deals for $49 each. I hope when they arrive they aren't too junky!
As usual, we have been lucky enough to see some spectactular sunrises and sunsets:
In October I will be presenting some research at the CDANZ Conference in Wellington, so hope to catch up with some Welly people then (though I am only there for two nights).
Hope to catch up with you all again soon
Sam (& Jan)